


[adrotate banner=”1124″]
Xencelabs’ Pen Display Bundle 16
I first got a sneak peek of Xencelabs’ Studio Series 16 display tablet at the FMX confab in Stuttgart, Germany. And it was within a week of returning home that I had a review model in my hands to play with. Frankly, it doesn’t disappoint.
The smaller, younger sibling of the 24” display doesn’t suffer because of its size. The 4K screen is crisp, and the high contrast of the OLED display is wonderful — especially with the color range of 1.07 billion colors with a 98-99% color gamut range for Adobe RGB, P3-D65, sRGB and Rec.709 — and an 82% coverage for Rec.2020. When fully powered with an external power supply, the display shines at 300 nits — but only drops to 170 nits if you are using your workstation or laptop as the power source. Granted, these don’t sound terribly bright compared to large OLED screens, but that’s oranges and apples. Plus, the non-glare surface of the screen means that you don’t need a sun-bright display, even in brighter environments.
The “16” stands for both the diagonal measurement of the screen and the width of the whole tablet. This means that the screen doesn’t reach the edges of the tablet itself, providing a comfortable bezel around the edge for your hand to rest. The body itself is pretty light at only 2.7 lbs., so it’s not only backpack size but can also easily be used on your lap. The bundle pack comes with a lightweight stand that the tablet simply sets on. I find this really handy as I can have it as a second monitor while it sits in the cradle. Since it’s not “mounted” into the stand, I can lift it up and set it in my lap for casual drawing tasks. The convenience is helped by the fact that it’s tethered by only one, 1.5m USB-C cable, attached to a hub that provides all the rest of the connections.
Like the larger tablet, the 16 comes with two different styluses, so you have some options based on your preference — or if you like the thicker stylus for certain tasks and the pencil-like thin stylus for others. Additionally, you still get the Quick Keys remote “puck,” which I always love because I don’t necessarily like having to use the keyboard for shortcuts and keystrokes when I’m drawing and painting. The remote sits in one hand, where you quickly develop muscle memory for your programmable tasks, and the stylus in the other.
At around $1,250, the 16 is an investment, but it offers a lot of fidelity — in line with more expensive, comparable display tablets. It’s light and portable. And when you are not on the run with a laptop, it still makes for a powerful tablet in your office and a great color-sensitive second monitor for compositing or editing.
Website: Xencelabs.com
Price: $1,249
Mosaic Xplor
Although scanning and photogrammetry have been a ubiquitous part of the VFX industry for many years, we have recently seen remarkable advances in capture devices and delivery formats. Polycam is a scanner in our phone. NeRF and Gaussian Splats are popular as lightweight, low-rez but surprisingly high-quality formats for games and apps. The question is: Where do we go from here? I think it’s about improving speed and volume, and Mosaic, a hardware tech and service company based in Prague, is one company to look at.
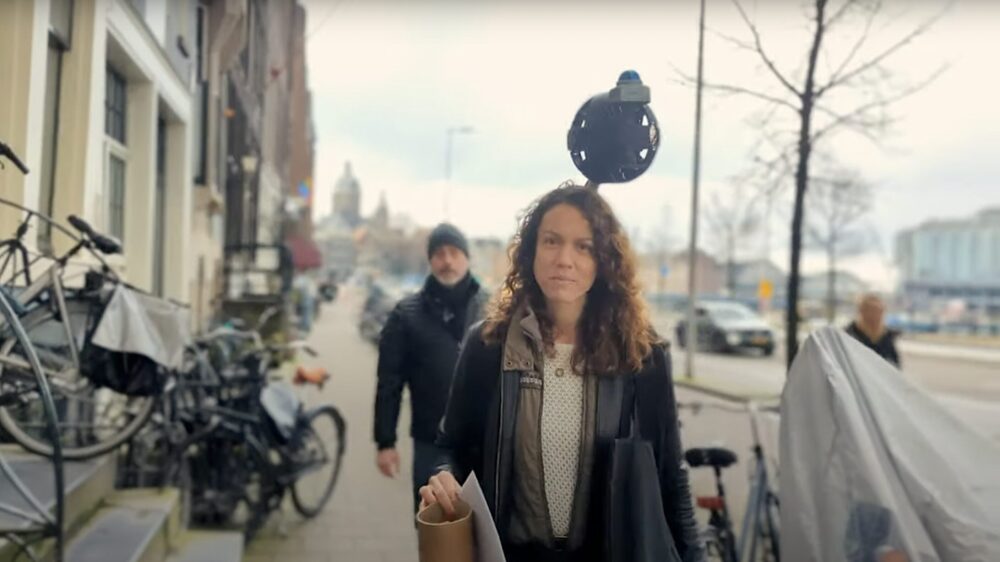
Mosaic has four robust 360 camera devices designed for capturing large areas and quickly — like mounted-on-a-traveling-car kind of quickly. But I’m going to focus this review on the Mosaic Xplor — a scanner designed like a backpack.
For a particular use-case scenario, I’ve been consulting on a short film that takes place in Amsterdam. The areas that we needed scanned were more pedestrian areas and there weren’t enough resources for a formal lidar scan or a traditional photogrammetry session, the latter of which consists of walking up and down the street taking hundreds of photos. In comes the Mosaic Xplor, which mounts onto the user’s back — the workstation is in the backpack part, while an arm mounts to the back and hangs out above the user’s head, fitted with an array of cameras for the photogrammetry at a total of 14K resolution with two 120-degree lidar scanners scanning at 400K points/sec to a range of 40 meters, which lock down the geo-position of the cameras.
The backpack only weighs 15 lbs. — 5 lbs. of which is the camera array overhead. That allows the user to walk around and scan with your hands free, allowing not only for comfort but also safety. But the capture system is still fast enough that you could capture if you are on a bike or a scooter.
The output is thick with data, which can be resolved into a textured mesh via photogrammetry or into NeRFs and Splats. Mosaic does offer processing services to convert data. They have a proprietary system for dealing with lens distortion from the cameras, but if you are clever you have the option of attempting a solve in the photogrammetry tool of your choice. Just know that you may have to take an extra step to iron out the lens distortion first.
Also, if you do have supplementary data, such as drone footage, traditional photogrammetry and texture photos, lidar scans and other geospatial data, you can get even higher accuracy and detail.
I found that even the decimated meshes have a ton of internal detail, with additional detail being derived from normal maps extracted from the data. The silhouettes of structures can get a little “rubbery,” but this is a limitation of photogrammetry as a process and not the capture system itself. There is plenty of data to accurately represent the volume, which even a junior modeler could make quick work of refining.
The Mosaic Xplor is portable, lightweight and compact, which allows you to get into areas that otherwise would be really difficult to scan. Yet, the support hardware ties itself to the photos being taken, making less guesswork in the final solve. In fact, being able to capture in a crowded Amsterdam pedestrian thoroughfare just proves how capable and versatile this is!
Website: Mosaic51.com
Planetside’s Terragen Sky
Of the 550-ish shots that we did on Marvel’s Black Panther feature, it wasn’t the suit replacements, extensions of the African terrains, battling rhinos or vibranium explosions that were the most troublesome — it was the skies. We had a team of matte painters working with the film’s vfx supervisor, Andrew Brown, to design and sculpt all of the African skies over Wakanda. Planetside Software, who has brought us the geo-generating app Terragen, has been developing a sister app called Terragen Sky — and if we had had that then, perhaps we would have felt a little less pain.
Terragen Sky is kind of like … a sky designer: It uses all of the rendering and simulation math from Terragen but has stripped out the complexity of world-building and the nodal system and left just the tools to design the skies. This makes it responsive, interactive and fun.
The interface is pared down to a control panel surrounding the viewport filled with different kinds of controls. Click in the viewport to place your sun or adjust the position via the circle in the top left, which is your sun position — kind of a top-down view of the world with the perimeter being the horizon.
Below that is a height diagram of your scene showing where your different layers of clouds are, how thick they are and how high your camera is. Each block is interactive, so you can pull the layers around. You can manually move your camera around or turn to the bottom left to enter values.
On the right of your screen are your cloud controls. You can activate different layers of clouds and determine the cloud cover, thickness and height (reflected in the height diagram). And there are drop-down menus allowing you to choose the types of clouds in your layers — categorized by type and hinted at by which types of clouds normally live at specific elevations.
Moreover, to get you started there are a bunch of presets that you can audition to get close to the feeling you want and then dial in from there.
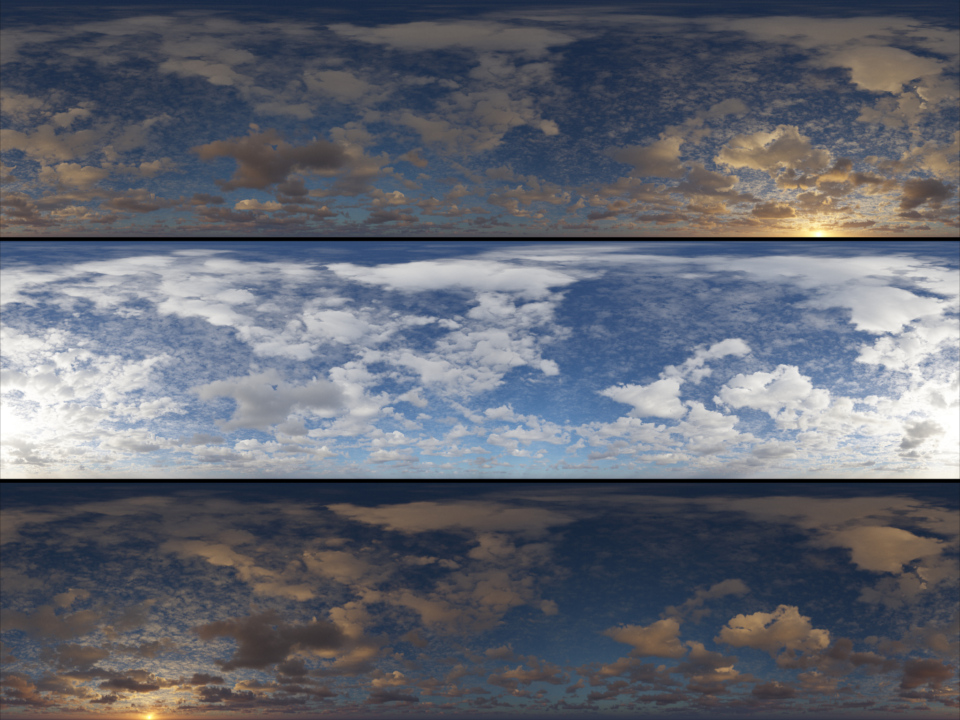
The renders are progressive, so they start chunky and continuously refine until reaching the render threshold. This makes for really quick prototyping to get the look, but admittedly, it can get quite slow when you want a high-quality, high-resolution HDR. Terragen and Terragen Sky are not set up for GPU acceleration, so you’ll want a bunch of CPU cores to speed up your renders.
The clouds are not animatable in Terragen Sky, but the scenes can be exported back to Terragen 4, where parameters can be animated. Furthermore, you can export your skies in the form of HDRs, and you can “Live Send” to Unreal or Unity and drive a virtual production volume. You even have a setting to calculate a very rough 360 first and then refine the image in the camera frustum.
Terragen Sky has been in early access since 2022, but the latest build was released just a few months ago. So, they are still hard at work. Some future features to look forward to include a paint module and the ability to export clouds as VDB files.
Website: Planetside.co.uk/terragen-sky
Prices: Subscriptions from $10 a month and $96 a year, to $56 a month and $492 a year
Todd Sheridan Perry is an award-winning VFX supervisor and digital artist whose many credits include I’m a Virgo, For All Mankind and Black Panther. He can be reached at teaspoonvfx.com.
